Hexagon Cardigan Crochet Pattern Free - US crochet terms
My free hexagon cardigan crochet pattern (also called a Granny Hexi Cardigan), is an extract from my latest crochet book: The Granny Square Crochet Bible: Everything You Need to Know about How to Crochet Granny Squares by Lynne Rowe.
This is the US crochet version. Find the UK version here: Hexagon Cardigan Crochet Pattern in UK crochet terms.
Reprinted with permission from David and Charles. Text and Design © Lynne Rowe 2025. Layout and Photography © David and Charles, Ltd 2025.
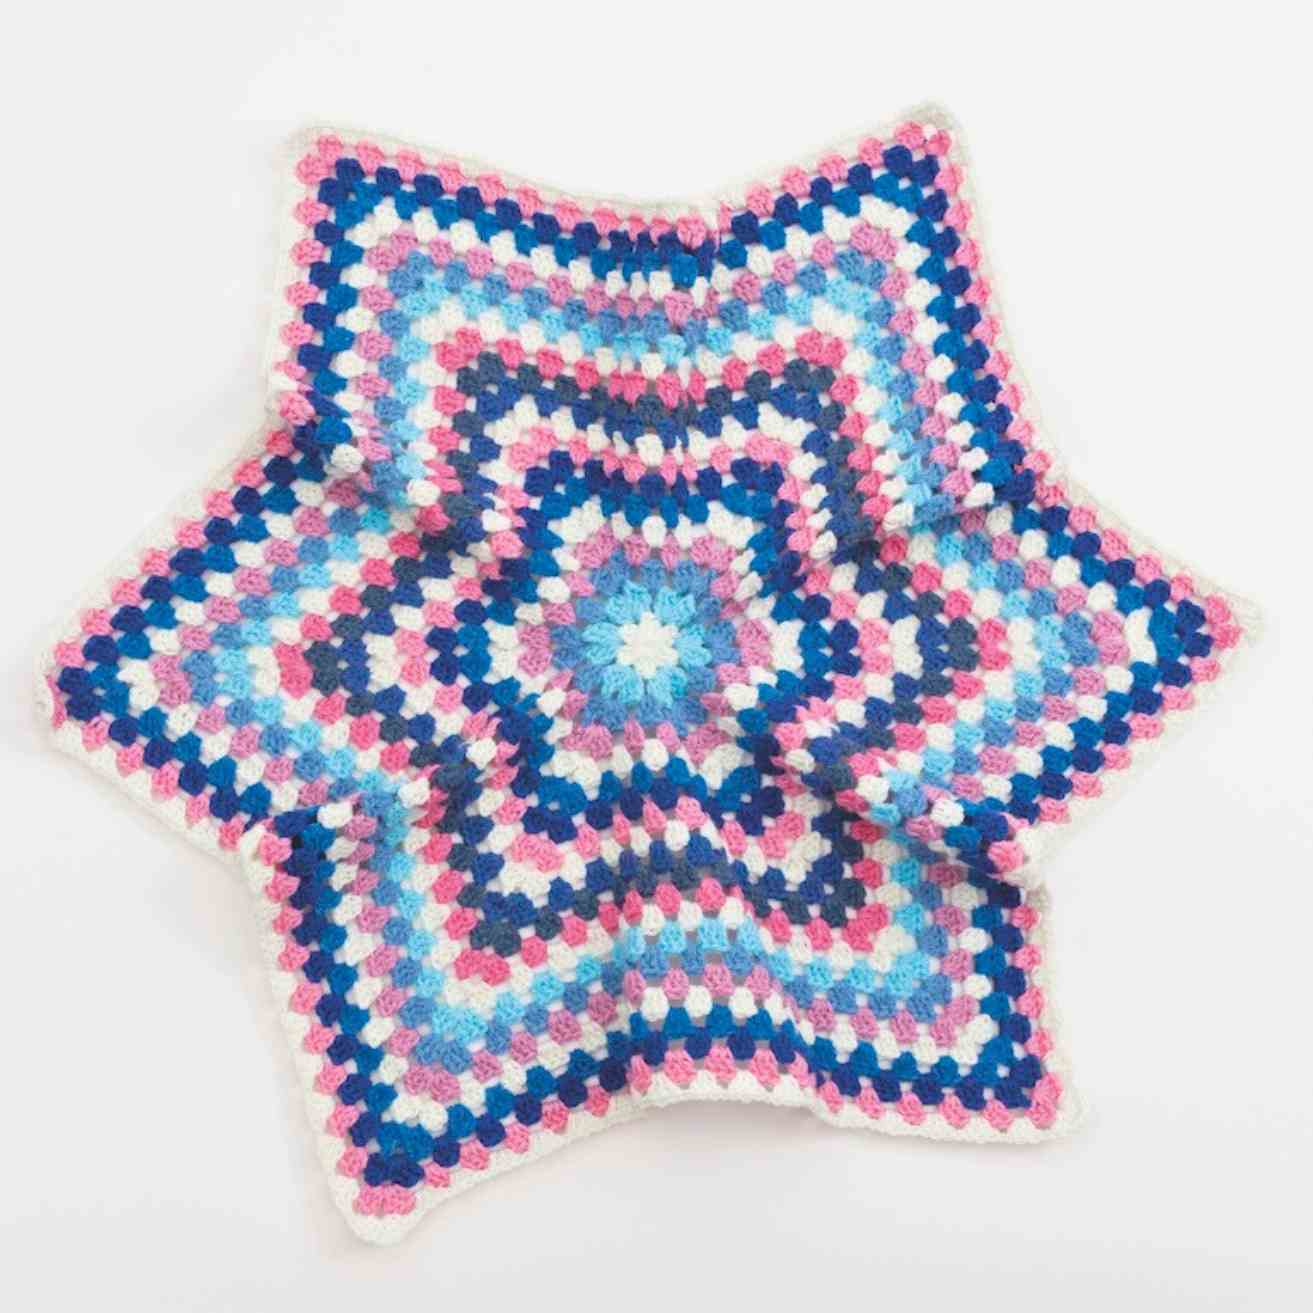
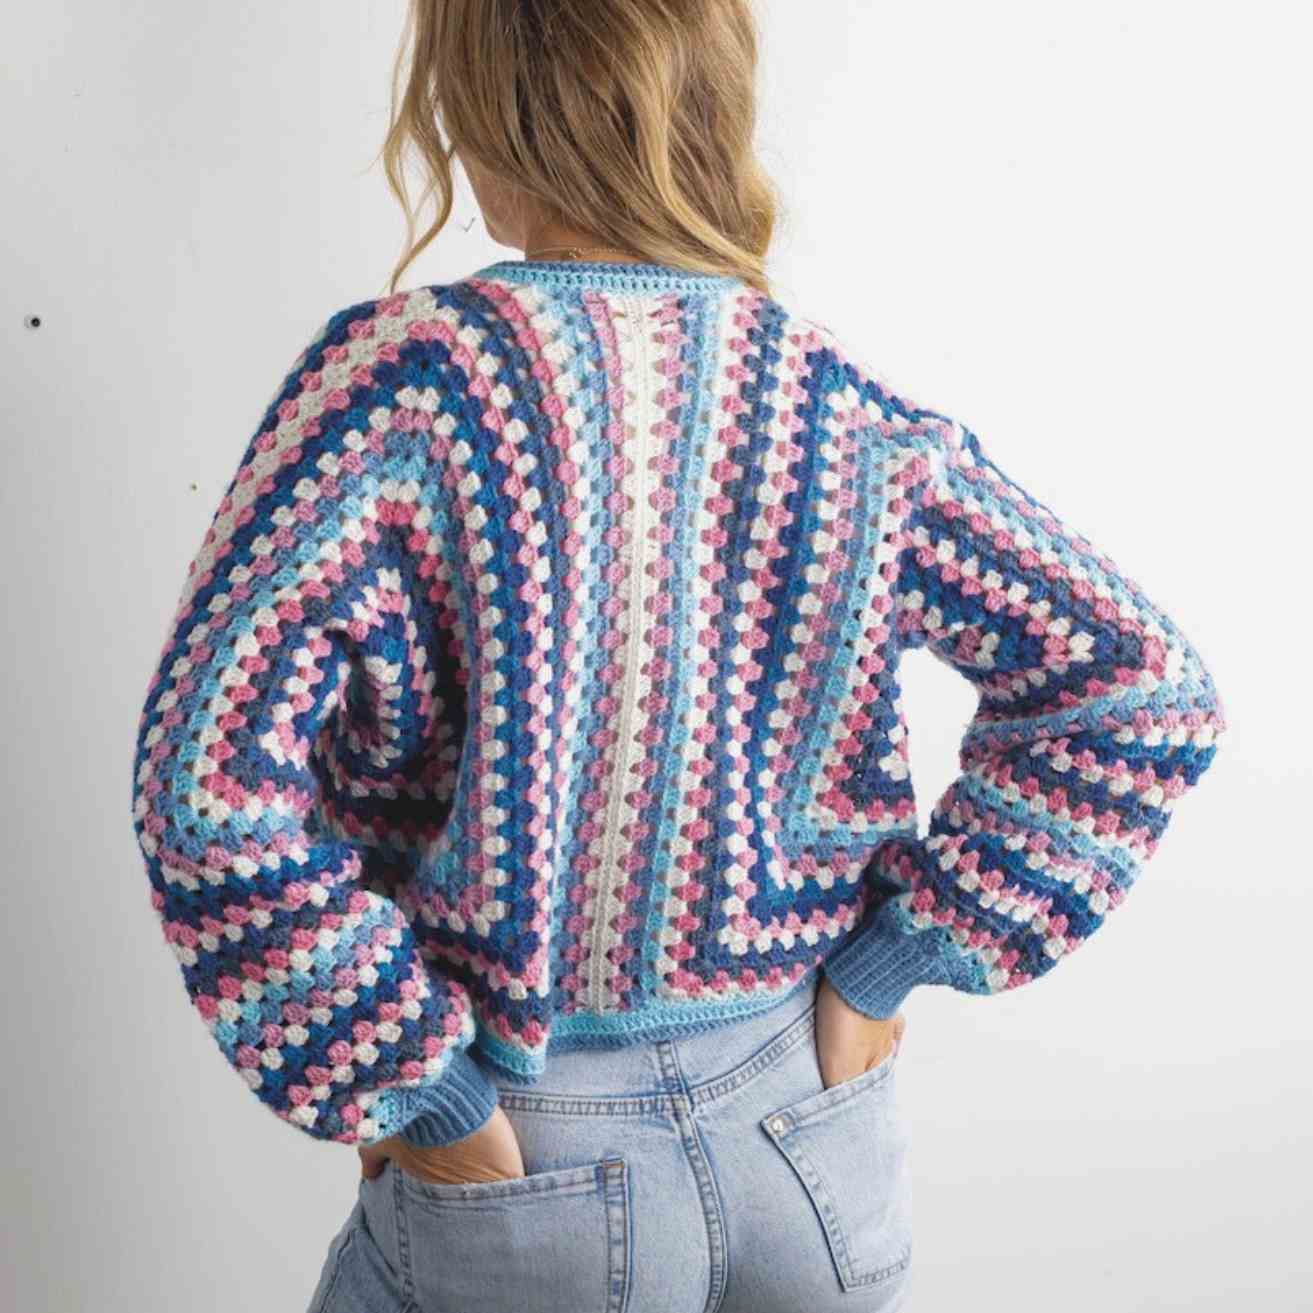
Start your handmade wardrobe with this stylish Granny Hexagon Cardigan. You can use the colors listed or choose your favorite colors to create your own unique version. It’s much easier to make than it looks, as it’s based on two hexagon motifs. It’s a slouchy style and very comfy to wear, and when people ask you where you got it from, you can proudly say that you made it yourself.

For Your Hexagon Cardigan Crochet Pattern You Will Need
Yarn
- Scheepjes Scrumptious (50% polyester; 50% acrylic), light worsted (DK) weight, 328yd (300m) per 31/2oz (100g) ball
- Color 1: 1 ball of Buttercream Icing (302)
- Color 2: 1 ball of French Blue Macaron (343)
- Color 3: 1 ball of Raspberry Rock Candy (335)
- Color 4: 1 ball of Raspberry Mousse (307)
- Color 5: 1 ball of Coconut Spirulina Cheesecake (342)
- Color 6: 1 ball of Butterfly Pea Flower Mousse (352)
- Color 7: 1 ball of Cotton Candy Meringue (330)
- Color 8: 1 ball of Concord Grape Pie (356)
- Color 9: 1 ball of Coconut Blueberry Muffins (378)
- Color 10: 1 ball of Turkish Delight (331)
- Note that any light worsted (DK) yarn will work for this hexi cardigan, or two strands of 4ply held together. Approximately 450-550g in total is needed, depending on size being made.
Hook
- US G/6 (4mm) crochet hook
Extras
- Removable stitch marker
- Yarn needle
Gauge/Tension
- 10.5 rounds and 5 pattern repeats of [3dc, ch1] measure 4 x 4in (10 x 10cm) using US G/6 (4mm) hook and Scheepjes Scrumptious.
Finished Measurements Of Your Hexagon Cardigan Crochet Pattern
Approx Finished Chest Measurements:
- 43 (47) (50) (53) (56) (61)in
- 111 (119) (127) (135) (142) (155)cm
To fit chest:
- 32–34 (36–38) (40–42) (44–46) (48–50) (52–54)in
- 81–87 (91–97) (102–107) (112–117) (122–127) (132–137)cm
Approx Upper Arm Depth:
- 7 (7) (8) (8) (8.5) (8.5)in
- 18 (18) (19.5) (19.5) (21) (21)cm
Side Seam:
- 10 (101/2) (11) (12) (12.5) (13.5)in
- 24.5 (26.5) (28) (30) (32) (34.5)cm
Pattern Notes
For this hexagon cardigan pattern, 3dc-groups with ch1-sps are used throughout, therefore creating a hexagon that doesn’t sit flat. This shape is required in order to achieve an L-shaped piece for each half of the cardigan.
Abbreviations
- ch(s) = chain(s)
- ch-sp(s) = chain spaces
- dc = double crochet (this is a UK tr treble crochet)
- rep = repeat
- sc = single crochet (this is a UK dc double crochet)
- sc2tog = single crochet 2 sts together (to decrease 1 st)
- slst = slip stitch
- BLO = back loop only
Hexagon Cardigan Crochet Pattern Begins
Body Section (make 2)
Using Color 1, ch5, then slst in first of these 5 ch to form a ring. Alternatively, you can start with a magic ring.
You will now work Round 1 into the ring you have made.
Place a removable stitch marker into the center of the ring so you know where to put your hook for Round 1.
1st round (RS): Ch3 (counts as 1dc throughout) 2dc in ring, ch2, [3dc in ring, ch2] 5 times, then slst in third ch of beginning ch-3, then fasten off. (6 3dc-groups, 6 ch2-sps)
2nd round (RS): Join Color 2 with slst in any ch2-sp, ch3, [2dc, ch2, 3dc] in same ch2-sp, ch1, [3dc, ch2, 3dc, ch1] in each ch2-sp to end, then slst in third ch of beginning ch-3, then fasten off. (12 3dc-groups, 6 ch2-sps, 6ch1-sps)
3rd round (RS): Join Color 3 with slst in any ch2-sp, ch3, [2dc, ch2, 3dc] in same ch2-sp, ch1, [3dc, ch1] in each ch1-sp to next corner ch-sp, *[3dc, ch2, 3dc] in next corner ch-sp, ch1, [3dc, ch1] in each ch1-sp to next corner ch-sp, then slst in third ch of beginning ch-3, then fasten off. (18 3dc-groups, 6 ch2-sps, 12 ch1-sps)
Round 3 is now repeated as follows:
Rounds 4–21 (21, 23, 23, 25, 25): Rep Round 3, in the following color sequence:
4th round (RS): Color 4.
5th round (RS): Color 1.
6th round (RS): Color 5.
7th round (RS): Color 6.
8th round (RS): Color 7.
9th round (RS): Color 1.
10th round (RS): Color 8.
11th round (RS): Color 9.
12th round (RS): Color 10.
Full Color sequence is set by Rounds 1–12.
Rounds 13–21 (21, 23, 23, 25, 25): Rep Round 3, following color sequence as set, ending with 21 (21, 23, 23, 25, 25) 3dc-groups along each side.
Fasten off, then weave in ends on wrong side.
Folding Your Crochet Hexagon Cardigan
- Number each corner of your hexagon in order, from 1 to 6 around in a clockwise direction, because this will help with folding.
- Fold corner 1 to meet corner 2, fold corner 4 to meet corner 5, then fold corner 3 to meet corner 6.
- This will create an L-shaped piece for each half of the body.

- Fold the hexagon, as in the diagram above, to make an “L” shape.
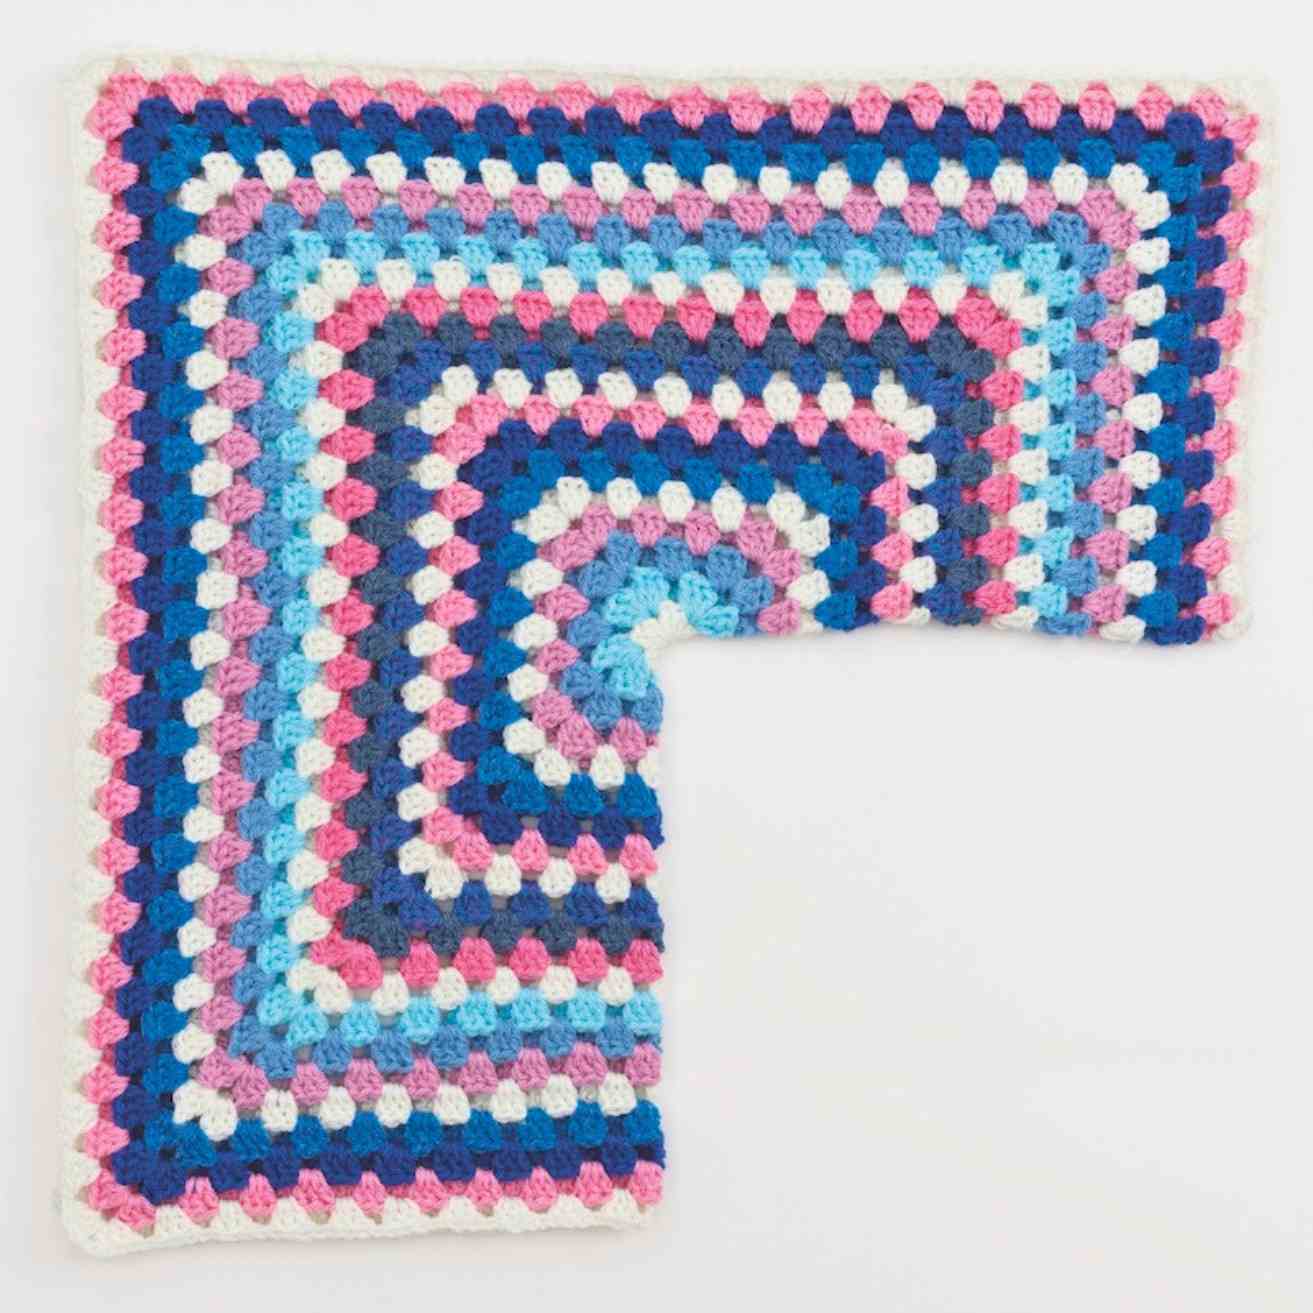
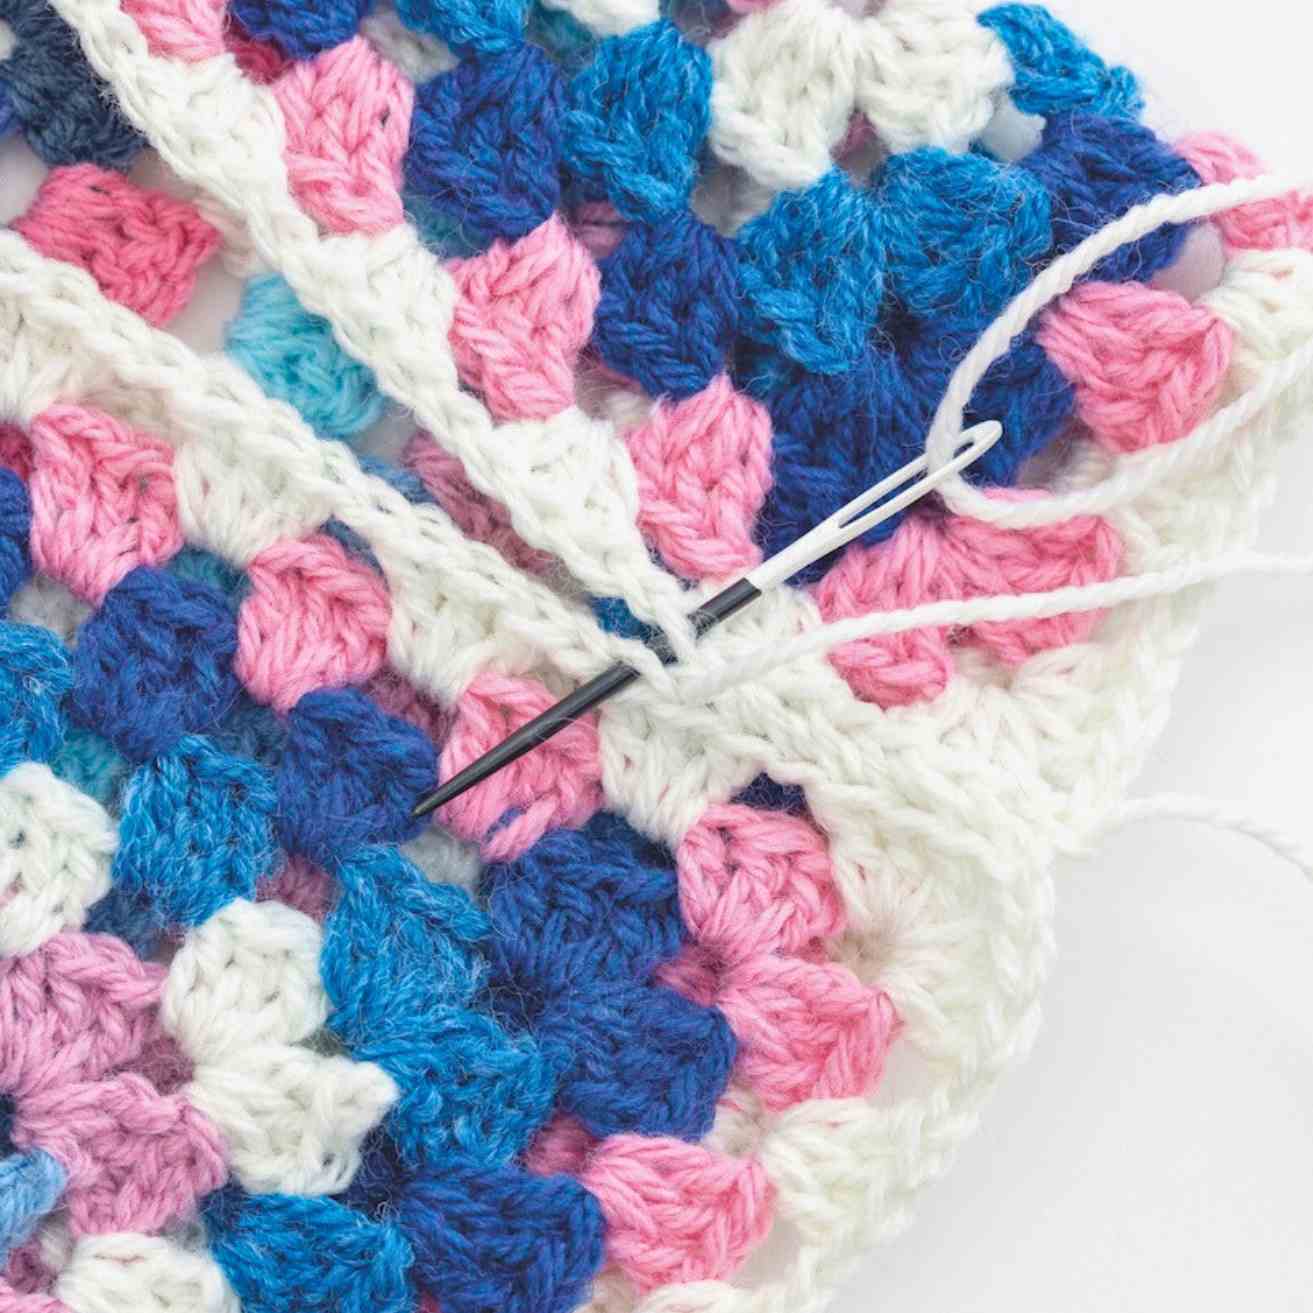
- Next, sew along one of the long edges to create the shoulder/sleeve seam, using whip stitch, because this will create a flat seam. Make sure you sew through the back loops of the stitches.
- If you place each piece side-by-side, you will see the arms and body taking shape.
- Continue both sides alike following the instructions to lengthen and widen the body.
- Repeat for the other piece, mirroring the seam.
Body Lengthening And Widening
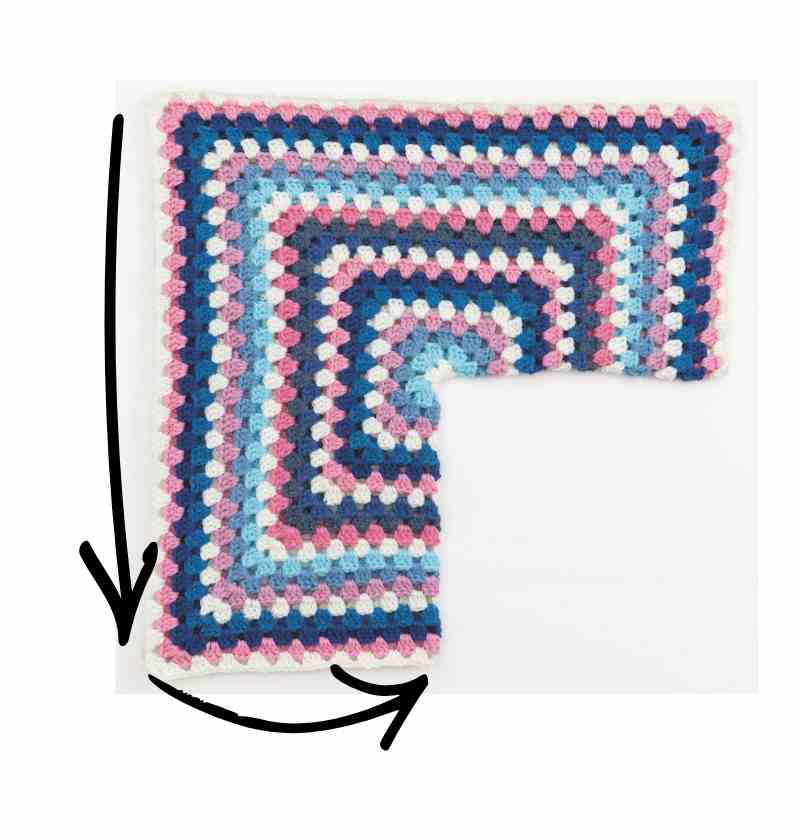
Keeping color sequence correct, and with right side facing, join next color yarn in any ch-sp in line with side seam. You will now work around only three sides of the piece. These three sides are the bottom hem, the front edge and centre back edge - I have indicated these in the diagram below, so you can see where to work.
Round 1 (RS): Ch3, 2dc in same ch-sp, ch1, [3dc, ch1] in each ch-sp around, then slst in third ch of beginning ch-3, then fasten off. (Errata: text in red updated 3rd Feb 2026)
Rounds 2–4 (6, 6, 8, 8, 12): Rep Round 1 a further 3 (5, 5, 7, 7, 11) times, maintaining color sequence.
You’ll have 25 (27, 29, 31, 33, 37) rounds on both front and back.
Centre Back Widening
On left piece, place a stitch marker in ch-sp in line with shoulder seam, then join next color to opposite end of center back seam, in opposite corner ch-sp to marker. (24 (26, 28, 30, 32, 36) ch1-sps between markers)
Row 1 (RS): Ch3, 1dc in same corner sp, ch1, [3dc, ch1] in each ch-sp to marked sp, 2dc in marked sp.
Fasten off, but do not turn work.
Row 2 (RS): Join next color to top of beginning ch-3 of previous row, ch4 (counts a 1dc, ch1), [3dc, ch1] in first ch-sp, [3dc, ch1] in each ch-sp to last 2 dc, skip 1 dc, 1dc in last dc.
Fasten off, but do not turn work.
Row 3 (RS): Join next color to third ch of beginning ch-4 of previous row. Ch3, 1dc in same st, ch1, skip first ch-sp and first 3dc-group, [3dc, ch1] in each ch-sp to last ch-sp, skip last ch-sp, 2dc in last dc.
Fasten off, but do not turn work.
Row 4 (RS): Rep Row 2.
Rep Center Back Widening on second piece then join center back seam with whip stitch
Edging Your Crochet Hexagon Cardigan
Using next color in sequence, and with right side facing, join Color 1 with slst in bottom corner stitch of left front.
It is not necessary to count your stitches for the edging rounds. If you place stitches as instructed, your edging will sit nice and flat.
Foundation round (RS): Ch1 (does not count as a st), then work [2sc, ch2, 2sc] in same st, 1sc in each dc to opposite end of hem (skipping the ch1-sps), work [2sc, ch2, 2sc] in corner ch2-sp. Now work along front edges and neck, as follows: 1sc in each dc and 1sc in each ch1-sp to row-ends of center back, work 2sc in each of the first 4 row-ends, 1sc in center back joining seam, then 2sc in each of the next 4 row-ends, then continue as before with 1sc in each dc and 1sc in each ch1-sp to end, slst in first sc to join, slst in next sc and slst in corner ch2-sp.
Next round (RS): Ch3 (counts as 1dc), 2dc in same corner sp, 1dcBLO in each st to next corner sp, 3dc in corner sp, 1dcBLO in each st to end, then slst in top of beginning ch-3 to join, invisible fasten off.
Next round (RS): Join next color in sequence to BLO of center dc of corner stitches. Ch3 (counts as 1dc), 2dc in BLO of same st, 1dcBLO in each st to next corner st, 3dc BLO in corner st, 1dcBLO in each st to end, then slst in top of beginning ch-3 to join, fasten off.
If desired, you could create a deeper edging, by repeating the last round as many times as required.
Weave in ends on wrong side.
Sleeves
Round 1 (RS): Join next color yarn to any ch sp, ch3 (counts as 1dc), 2dc in same ch-sp, ch1, [3dc, ch1] in each ch-sp around and in join of shoulder seam, then slst in third ch of beginning ch-3. Fasten off. (22 (22, 24, 24, 26, 26) 3dc-groups and ch1-sps)
Rounds 2–17: Maintaining color sequence, rep Round 1.
NOTE: Sleeves can be lengthened or shortened by working more or fewer rows here.
Weave in ends on wrong side.
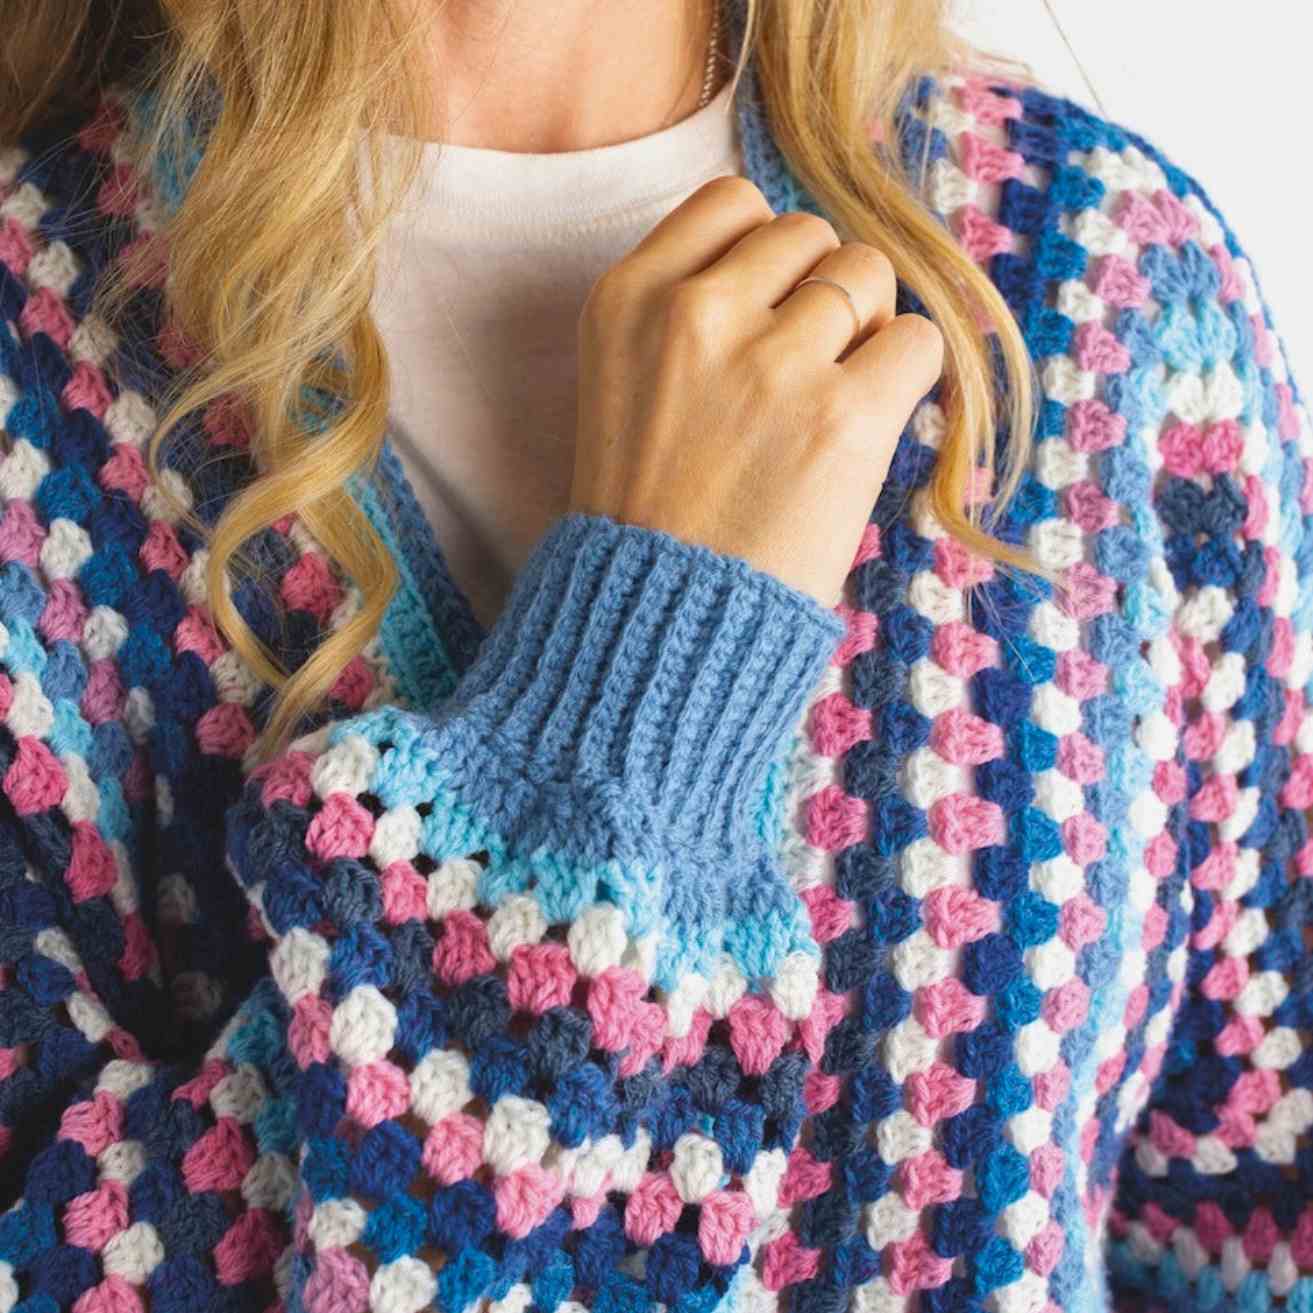
Sleeve Cuffs
- Foundation round (RS): Join Color 1 to any ch-sp, ch3 (counts as 1dc), work 1sc in each dc (skipping the ch1-sps), then slst in third ch of beginning ch-3. 66 (66, 72, 72, 78, 78) sts.
- Next round (decrease round): Ch1 (does not count as a st), 1sc in first st, sc2tog, (1sc in next st, sc2tog) to end, then slst in first sc. 44 (44, 48, 48, 52, 52) sts.
Sleeve Ribbing
- Row 1 (RS): Ch15, 1sc in second ch from hook, 1sc in each ch to end, slst in next st of decrease round, slst in following st of decrease round, turn. (14 sc)
- Row 2 (WS): Skip last 2 slsts, 1scBLO in each st to last st, 1sc in last st, turn.
- Row 3 (RS): Ch1 (does not count as a st), 1sc in first st, 1scBLO in next 13 sts, slst in next st of decrease round, slst in following st of decrease round.
- Repeat Rows 2 and 3 around the sleeve edge, until all sts of decrease round are used up.
- Fasten off.
Finishing Your Crochet Hexagon Cardigan
Sew up ribbing seam on cuff then weave in ends on wrong side.
What next?
If you loved crocheting your own handmade wardrobe, you can add a new piece with my easy crochet scarf pattern here: Easy Crochet Scarf Pattern
Let's keep in touch!
I'd love to chat more.
Sign up for my newsletter and receive a weekly dose of crafting inspiration, featuring the latest trends, tips, and projects to fuel your creativity.


The Lengthening and Widening section is confusing. Where exactly on the project is this worked? The bottom or the front?
Hi Paige, I have added a diagram with arrows to help. It's the remaining three open sides which are now the centre front, centre back and hem. I hope this helps - do let me know if not, Lynne
hi i would love to make this in a plain colour and was just wondering how many 100g balls I would need please? I have a stash already of chocolate brown and was hoping I'd have enough haha.
many thanks
Hi Chelsea, which size are you wanting to make? From my own usage, I estimate between 450g and 550g of double knitting weight yarn is required.
The lengthening and widening portion is a little confusing. The bottom of the front and back going towards the hem, should that be 3dc, ch2, 3dc, ch 1? Also, is it 3dc+ ch1 for each space like during the rest of the hexagon?
** overall, super easy and fun to make!**
Thanks!
Hi Danielle, thanks so much for your comment - the answer is yes there should be ch1 in between the 3dc, as before. I have updated this in the post. Many apologies, I hope you can now continue with your cardigan, Lynne x