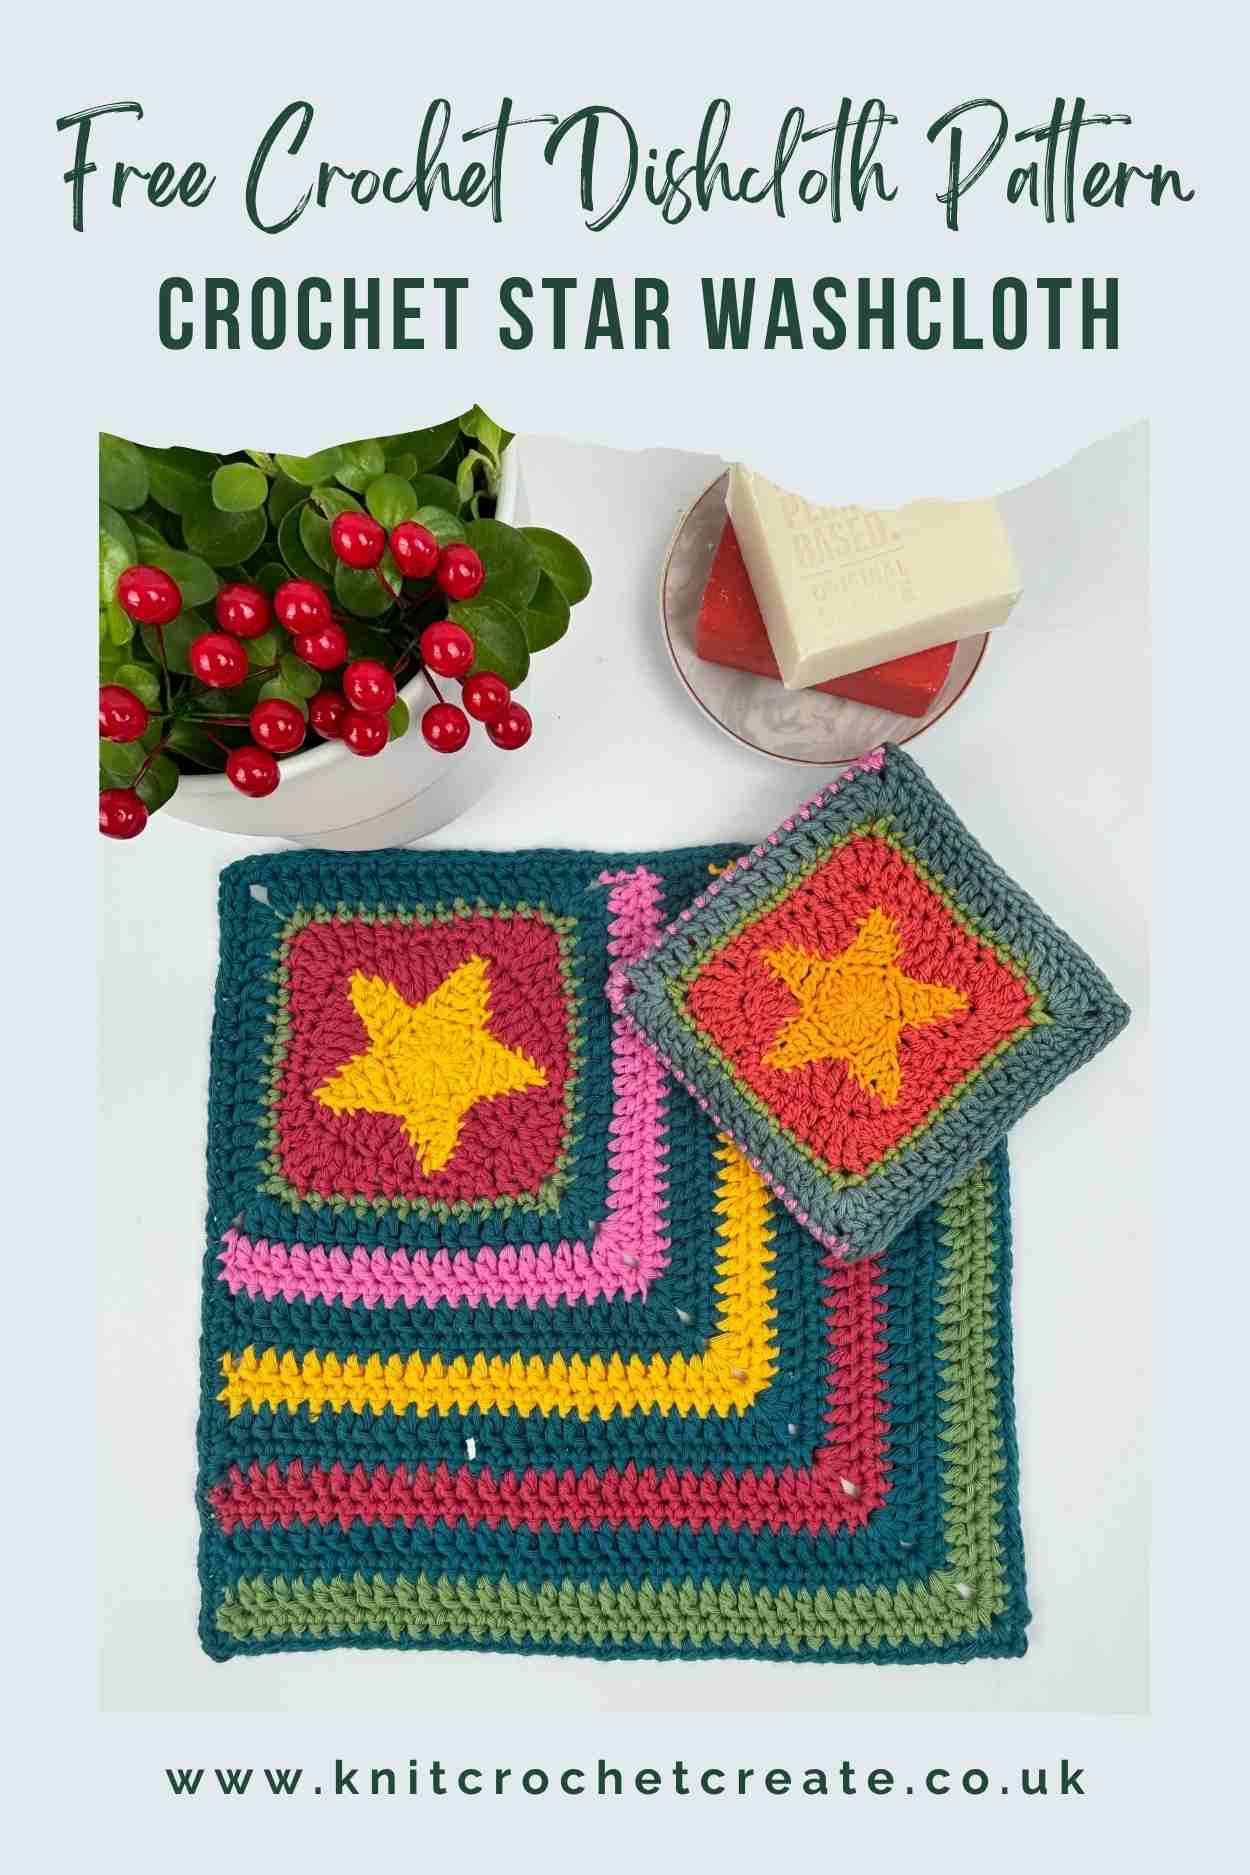
Free Crochet Dishcloth Pattern
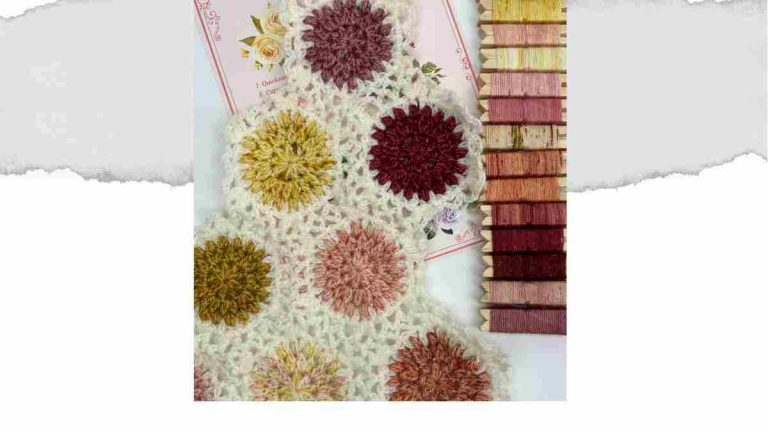
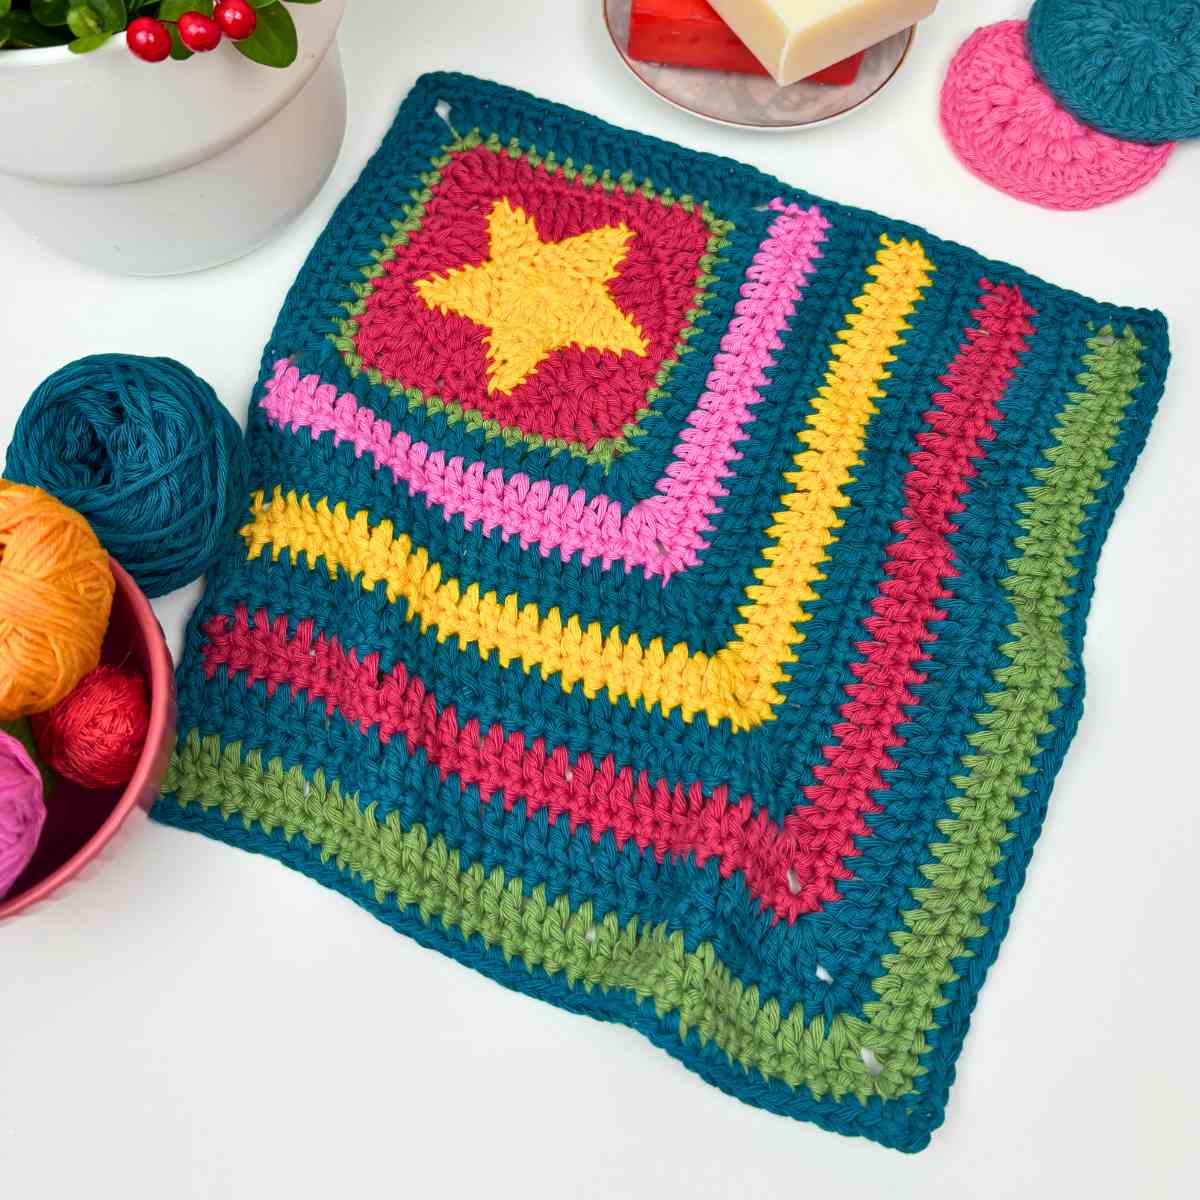
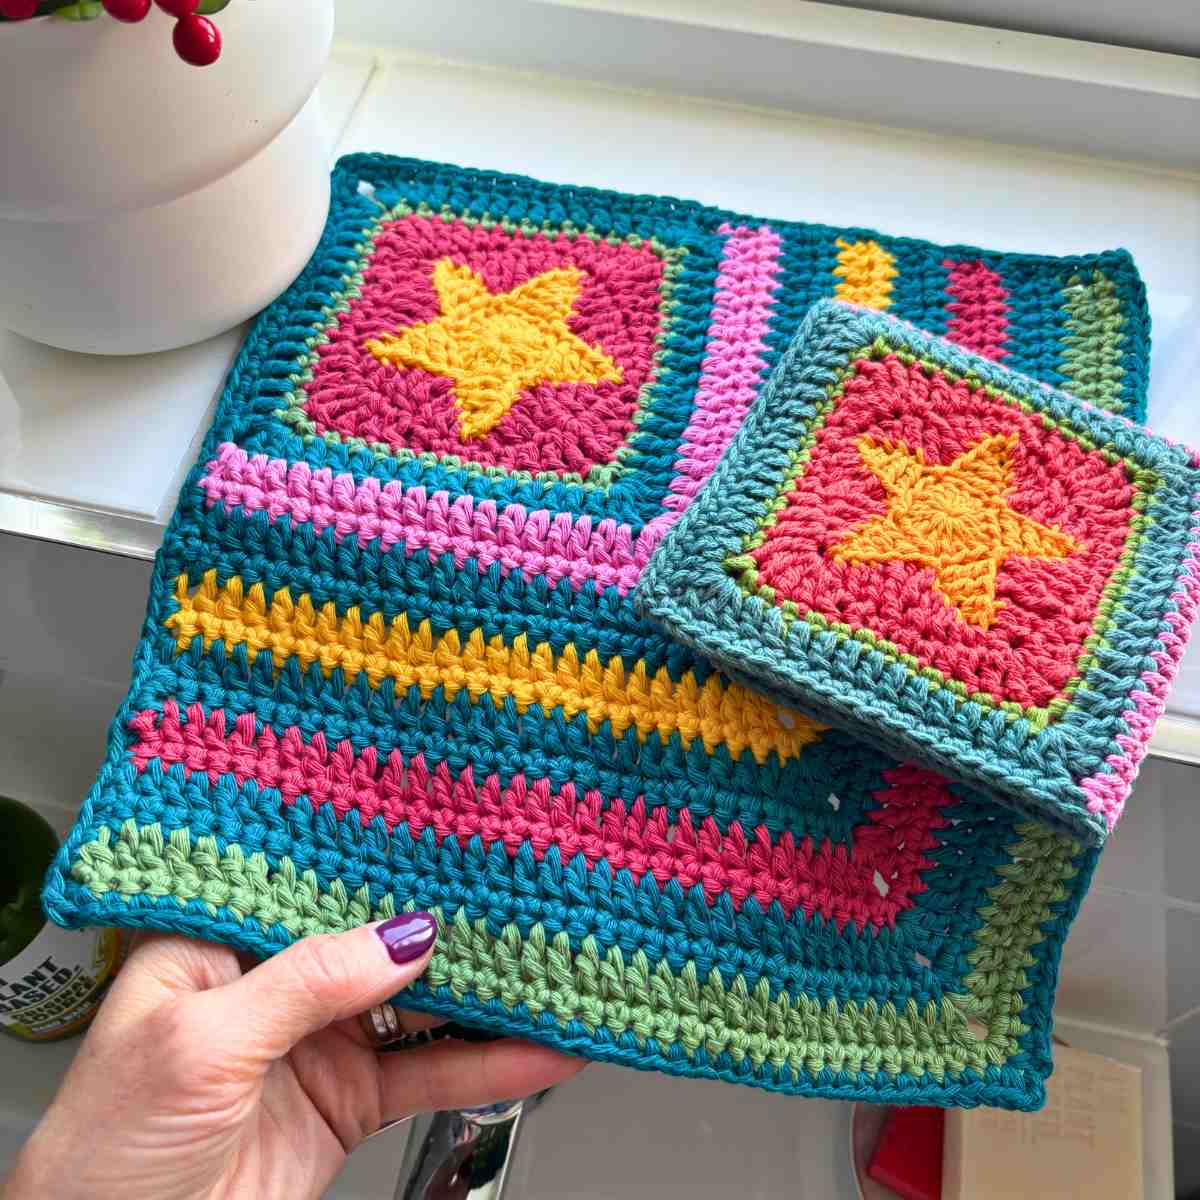
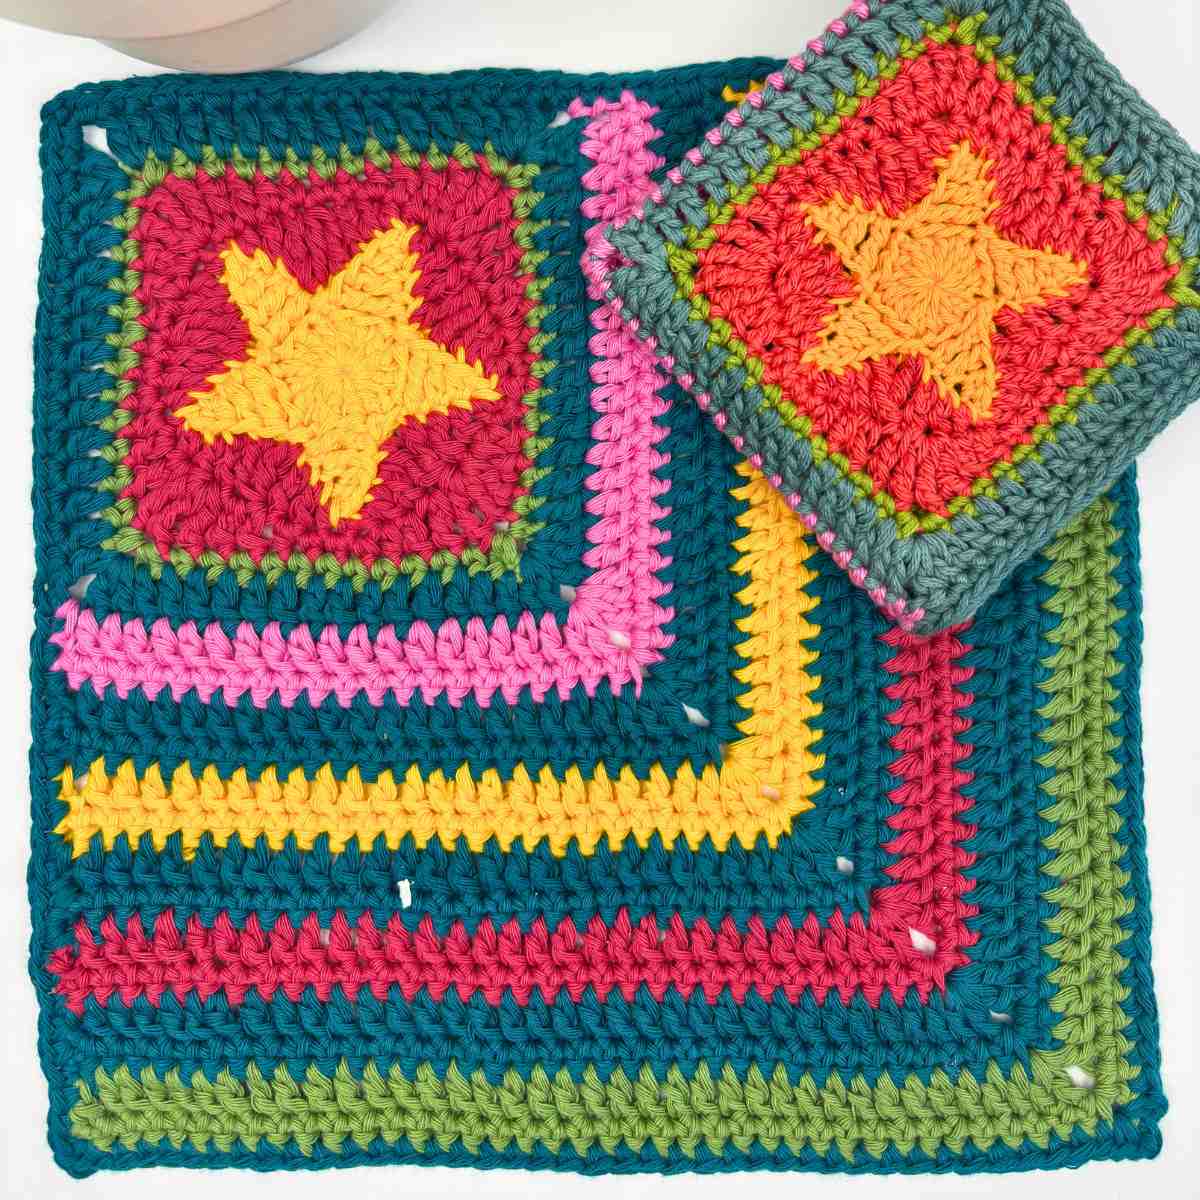
Are you looking for a free crochet dishcloth pattern that stands out? Then the Starlight Dishcloth is a lovely project to try. The design starts with a small granny square featuring a bright star motif at the centre, then simple rows are added along two sides to form a clean mitred shape. It’s quick to make, easy to customise, and ideal for using up leftover cotton yarn.
The bold colours help give this washcloth a cheerful look. You can create yours in matching shades, or use up odds and ends from your yarn stash for a fun, scrappy version.
Why You'll Love This Free Crochet Dishcloth Pattern
The Starlight Dishcloth is perfect for use in the kitchen or bathroom, and its features include:
- Striking star motif – which sits at the centre of a small granny square.
- Mitred construction – makes the rows flow neatly on the diagonal.
- Great stash buster – because it works well with small amounts of cotton.
- Practical and durable – for a kitchen dishcloth or a bathroom washcloth.
- Fast to make – making it ideal for last-minute gifts.
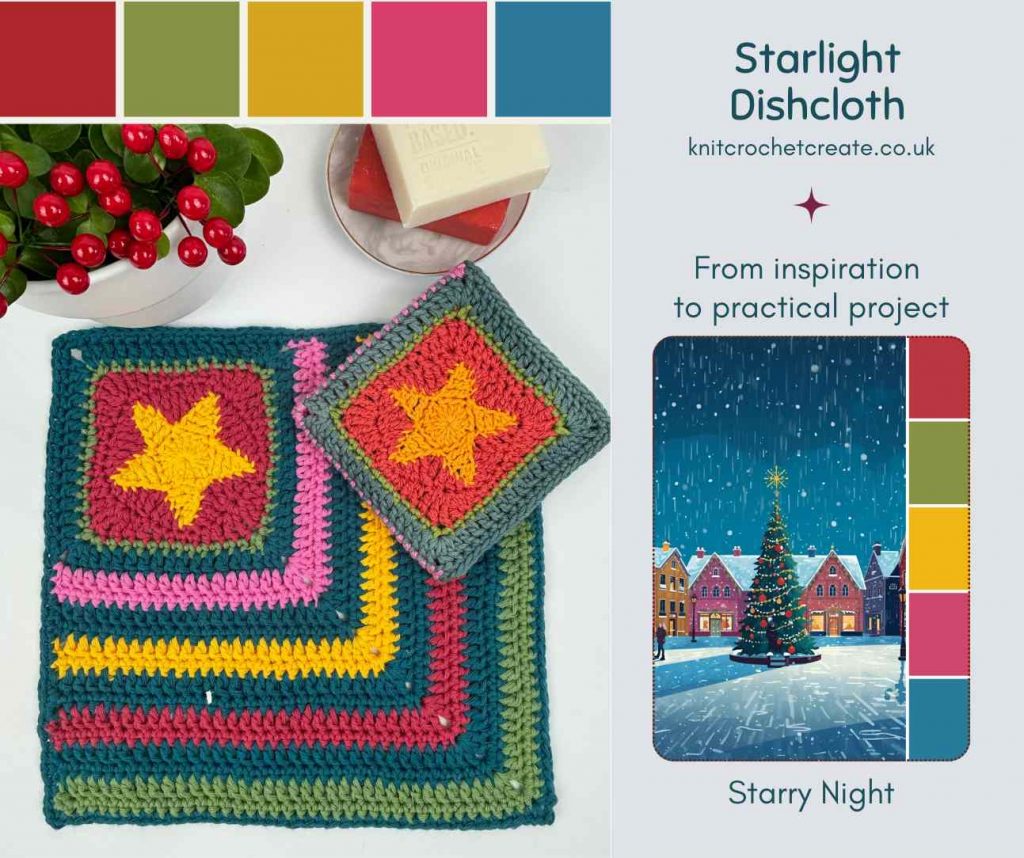
Colours I Used In My Dishcloth
My sample shown above is inspired by the Starry Night Colour Palette in our Stash to Sparkle CAL Blog Hop (see below for full Blog Hop details), with petrol blue, and pops of bright colours, but you can choose any colour palette you like.
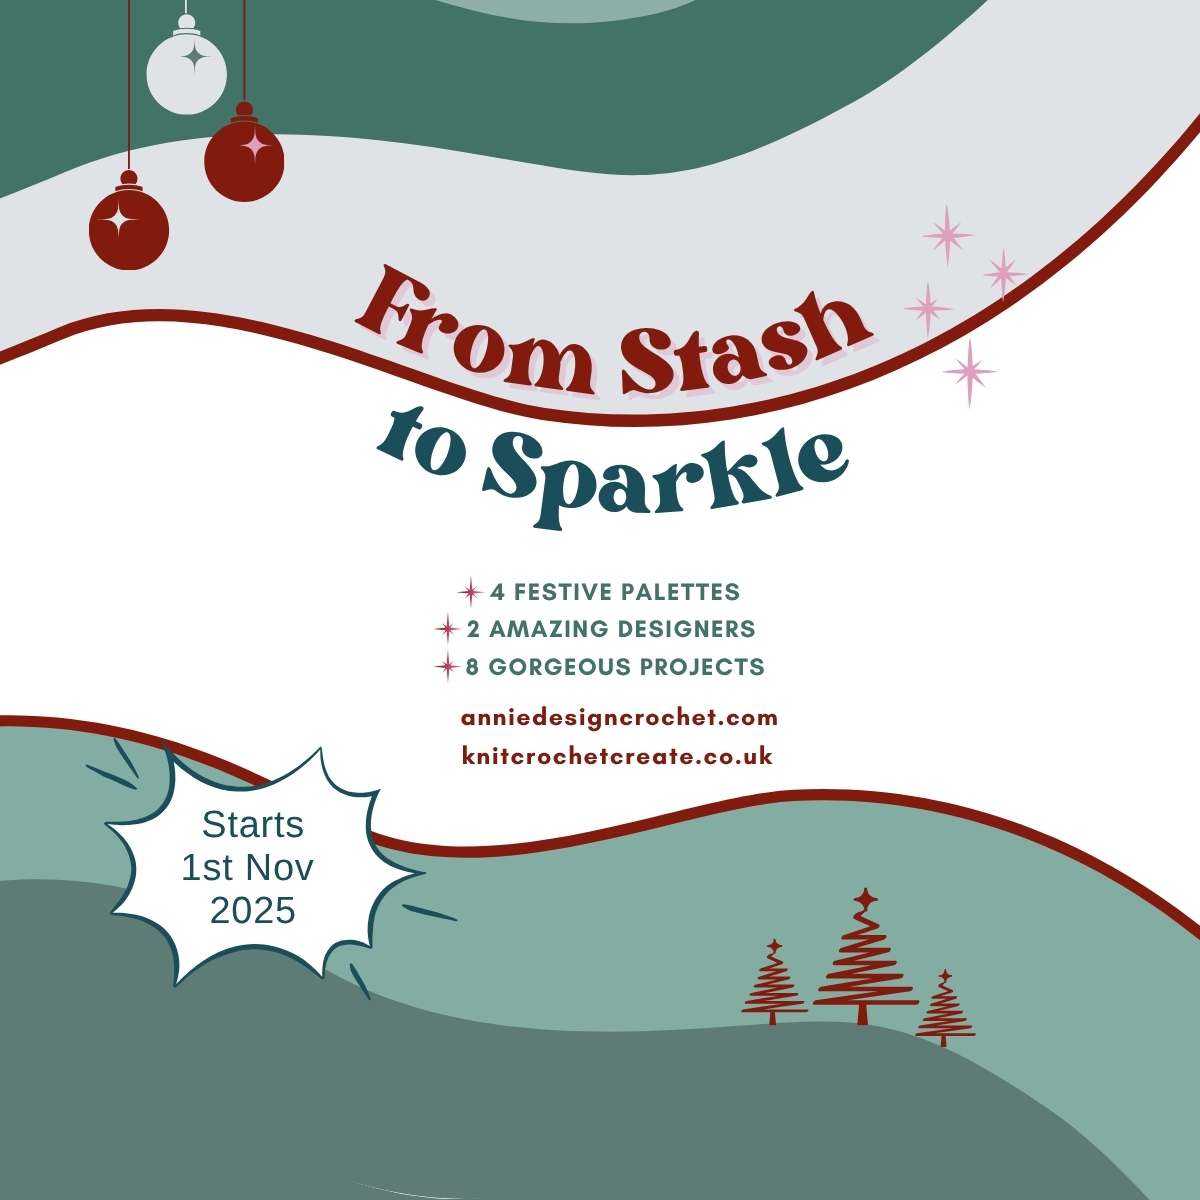
The Stash To Sparkle CAL Blog Hop
The Stash to Sparkle CAL is a 4-week blog hop running through November, with 8 free stash-busting crochet projects shared between Annie Design Crochet and myself. You can read all about it in the blog post here: Stash To Sparkle CAL.
How To Get Your Free Crochet Dishcloth Pattern
The pattern is written out in full in both US and UK crochet terms. US terms are given first, followed by UK terms.
Scroll down to the relevant pattern section to find the step-by-step instructions for the terms you prefer. You don’t need to sign up or log in because it’s free right here on the blog.
Yarn And Stitches Used
This free crochet dishcloth pattern uses a range of basic stitches (see abbreviations below). The central star motif is a fab challenge, and it's also great fun to see the star turn into a square. The main body uses straightforward rows, along two adjoining sides of the square.
Cotton yarn works best for a dishcloth because it is absorbent, and I used an aran weight (worsted weight). But if preferred, you can use a different thickness of yarn. Just make sure to use a crochet hook size that is recommended for your yarn.
I’ve used lots of yarn oddments from my stash, and even those small amounts are great for the individual elements of the dishcloth. This makes it the perfect zero-waste project too.
Why Crochet Your Own Dishcloth?
Crochet washcloths are a practical and sustainable alternative to store-bought options, because they’re reusable, washable, and can be customised in your favourite colours and yarn types. Plus, making your own washcloth is a mindful and creative way to relax while creating something useful, so it's a win-win option for sustainable and mindful crafting.
Share Your Makes!
I’d love to see your version of the Starlight Dishcloth! Share your finished washcloth on Instagram, and tag me @knitcrochetcreate. Don’t forget to use the hashtag #StashToSparkleCAL so I can admire your creations.
Copyright
Please read the copyright terms, which apply globally, before downloading your pattern:
The contents of this page, including the pattern instructions and images, are published under copyright to me ©Lynne Rowe 2021 under my brand Knit Crochet Create® and for your own personal use only. Feel free to sell items made from this pattern for charity fundraising purposes, or to gift to family and friends. But selling small numbers for profit is only allowed with permission. Please email lynne@knitcrochetcreate.com for permission to sell in small numbers. By downloading or using this pattern, you therefore agree to these terms.
Materials Needed For Your Crochet Dishcloth
Yarn
- Aran-weight (worsted weight) cotton yarn in five colours as follows:
- Main Colour: approximately 30g: Teal or Petrol Blue.
- 4 Contrast Colours: approximately 10g each: Colour 1 = Yellow; Colour 2 = Red, Colour 3 = Green; Colour 4 = Pink.
- 4.5mm (US 7) crochet hook.
- Yarn needle for weaving in ends.
Note: I used Scheepjes Cahlista to make my dishcloth: I found half a ball of Dark Teal 401, and small 10g balls of: Yellow Gold 208, Sage Green 212, Freesia 519, and Scarlet 192.
But you can easily use other yarn thicknesses too. I made one in double knitting yarn (light worsted weight) with 4mm (US G/6) hook, and one in 4ply with 3mm (US D/3) hook.
Measurements For Finished Dishcloth
- Approximately 26 x 26cm (10.25 x 10.25in) using Scheepjes Cahlista and 4.5mm (US 7) hook.
- Approximately 22 x 22cm (8.5 x 8.5in) using double knitting weight yarn (light worsted/8ply) and 4mm (US G/6) hook.
Tension
- Approximately 15.5 stitches and 11 rows in mitred pattern rows, to measure 10 x 10cm, using Scheepjes Cahlista (aran/worsted weight/10ply)and 4.5mm (US G7) hook. Tension may vary if you use a different yarn or hook size.
- Note that tension is not critical for this project, as it doesn't matter if your dishcloth turns out a different size.
Free Crochet Dishcloth Pattern Begins (US terms)
Abbreviations Used (in US terms)
- ch = chain
- ch-sp(s) = chain space(s)
- dc = double crochet
- dc2tog = double crochet two stitches together
- hdc = half double crochet
- sc = single crochet
- slst = slip stitch
- st(s) = stitch(es)
- tr = treble crochet
- tr2tog = treble crochet two stitches together (to decrease 1 stitch - see special stitches below)
- yo = yarn over
- Pattern repeat = [ ... ] or * or ** meaning to repeat instruction within brackets, or following the asterisk, as many times as stated
Special Stitches Used (in US terms)
- Treble crochet 2 stitches together (tr2tog)
- **Yarn over hook twice, insert hook into next stitch, yarn over hook then pull a loop through, [yarn over hook then pull through first two loops] twice**. Leave remaining loops on hook.
- Repeat from ** to ** once more (into stitch as specified in pattern) (3 loops now on hook).
- Finally, take yarn over hook then pull through all 3 loops.
Free Crochet Dishcloth Pattern Instructions (US terms)
Star Square (US terms)
Remember to use the recommended hook size for your yarn if you are not using aran weight (worsted weight).
With US G/7 (4.5mm) hook and Yellow, start with a magic ring, or ch5 then slst into the first of these 5ch to form a ring. Work Round 1 into the centre of the ring.
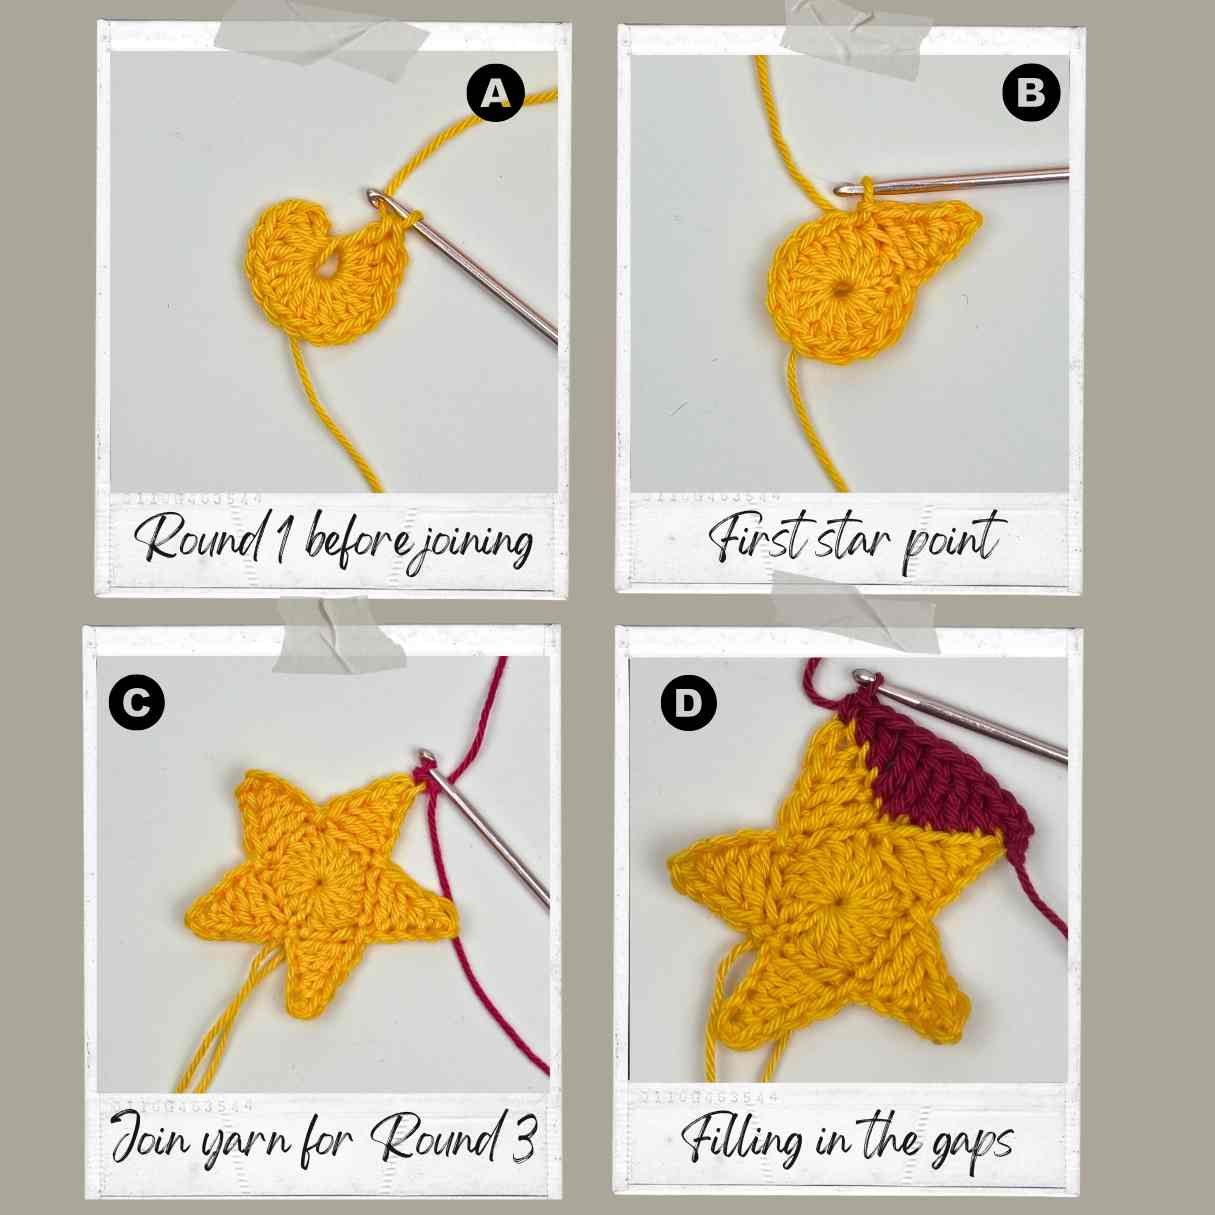
Round 1 (right side): Ch3 (counts as 1dc), work 14dc into the ring, then slst in the top of the beginning ch3. (15 dc) – see image A below.
In next round, you will make the star points.
Round 2: [Ch5, skip 1 ch (counts a ch1-sp), 1sc in second chain from hook, 1hdc in next ch, 1dc in next ch, 1tr in next ch, skip next 2 dc along Round 1, slst in next st] 5 times, then slst into base of first ch5. Fasten off Yellow (5 star points) – see image B below showing first point.
Next, you will work around the star to fill in the gaps between the star points.
Round 3: Join Red with a slst to any ch1-sp at the tip of a star point (this is into the skipped ch1 - it looks like a horizontal strand of yarn - see image C below). Ch1 (does not count as a st), starting in same st: *1sc in ch1-sp, 1hdcBLO in next st, 1dcBLO in next st, 1trBLO in next st, tr2tog over BLO of next st and first ch of next star (and therefore skipping the slst in between the points), working up next star point and along spare loops of chains, 1tr in next st, 1dc in next st, 1hdc in next st; repeat from * 4 more times, slst in first st. (40 sts) – see image D below for help with stitch placement.
Next you will create four corners (US terms).
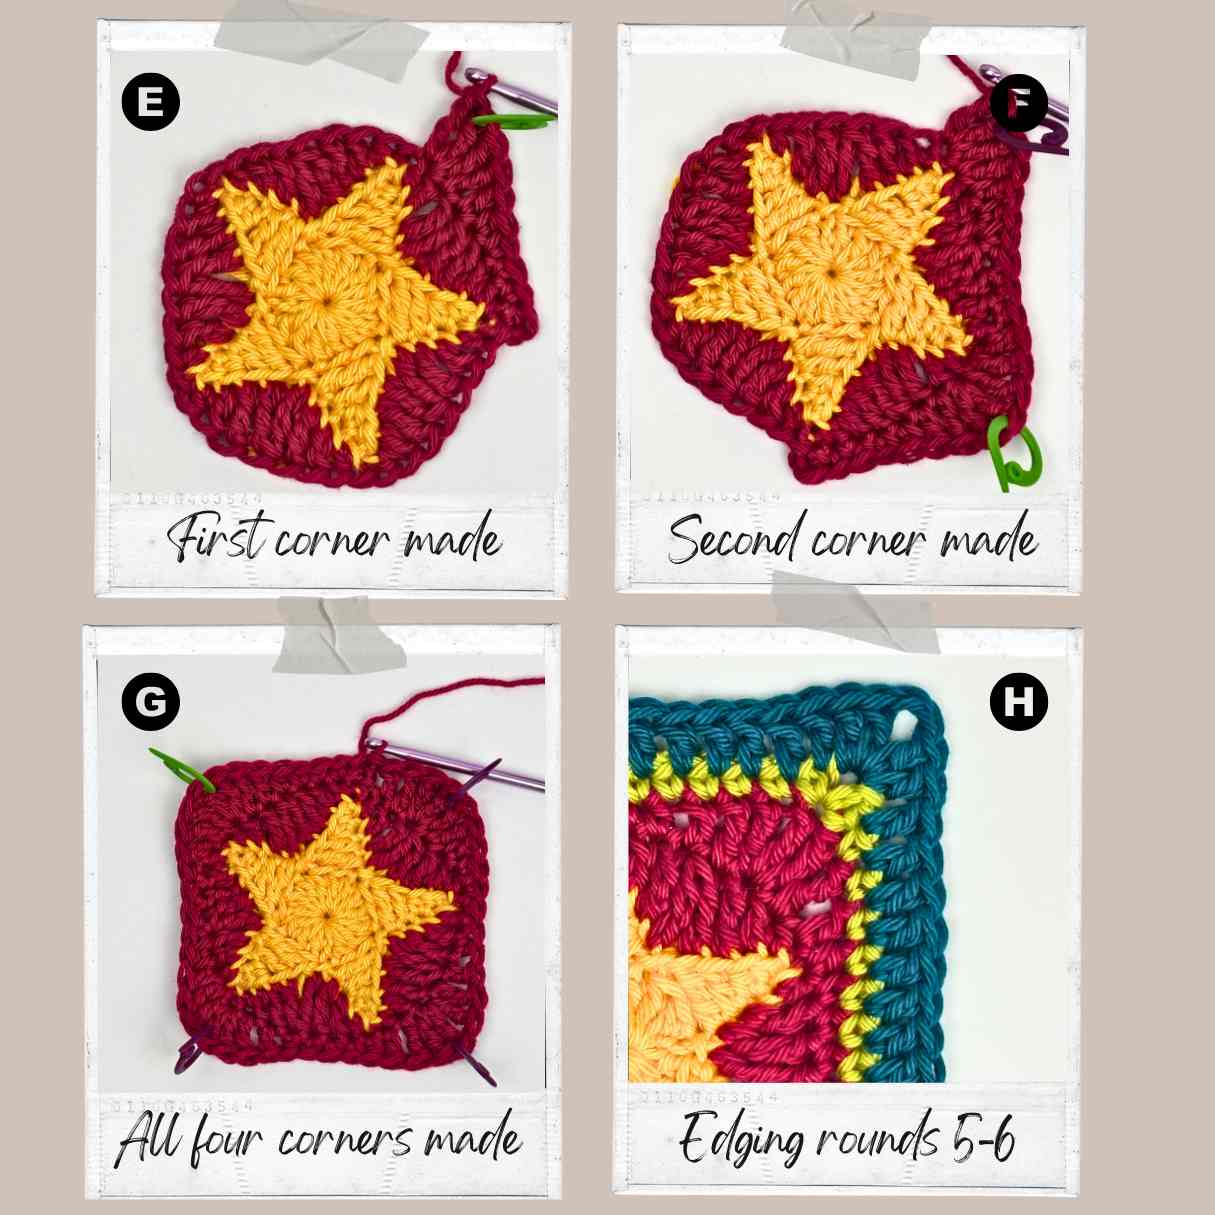
Round 4: Ch1, 1hdc in same st, *1sc in next 3 sts, 1hdc in next st, 1dc in next st, 1tr in next st, 3tr in next st for corner, 1tr in next st, 1dc in next st, 1hdc in next st; repeat from * 3 times more, omitting final hdc. Slst in first st, then fasten off. (48 sts) – see images E, F and G below.
TIP: Pop a stitch marker into each centre tr of corner group of 3tr for help with stitch placement on next round (see images E to G below). Remove them as you work into each marked stitch.
Round 5: Join Green with a slst, to centre tr of any 3tr corner. Ch1, starting same st: *[1sc, ch3, 1sc] in centre st, 1sc in each st to centre tr of next corner; repeat from * around, slst in first sc, then fasten off. (52 sc and 4 x ch3-sps)
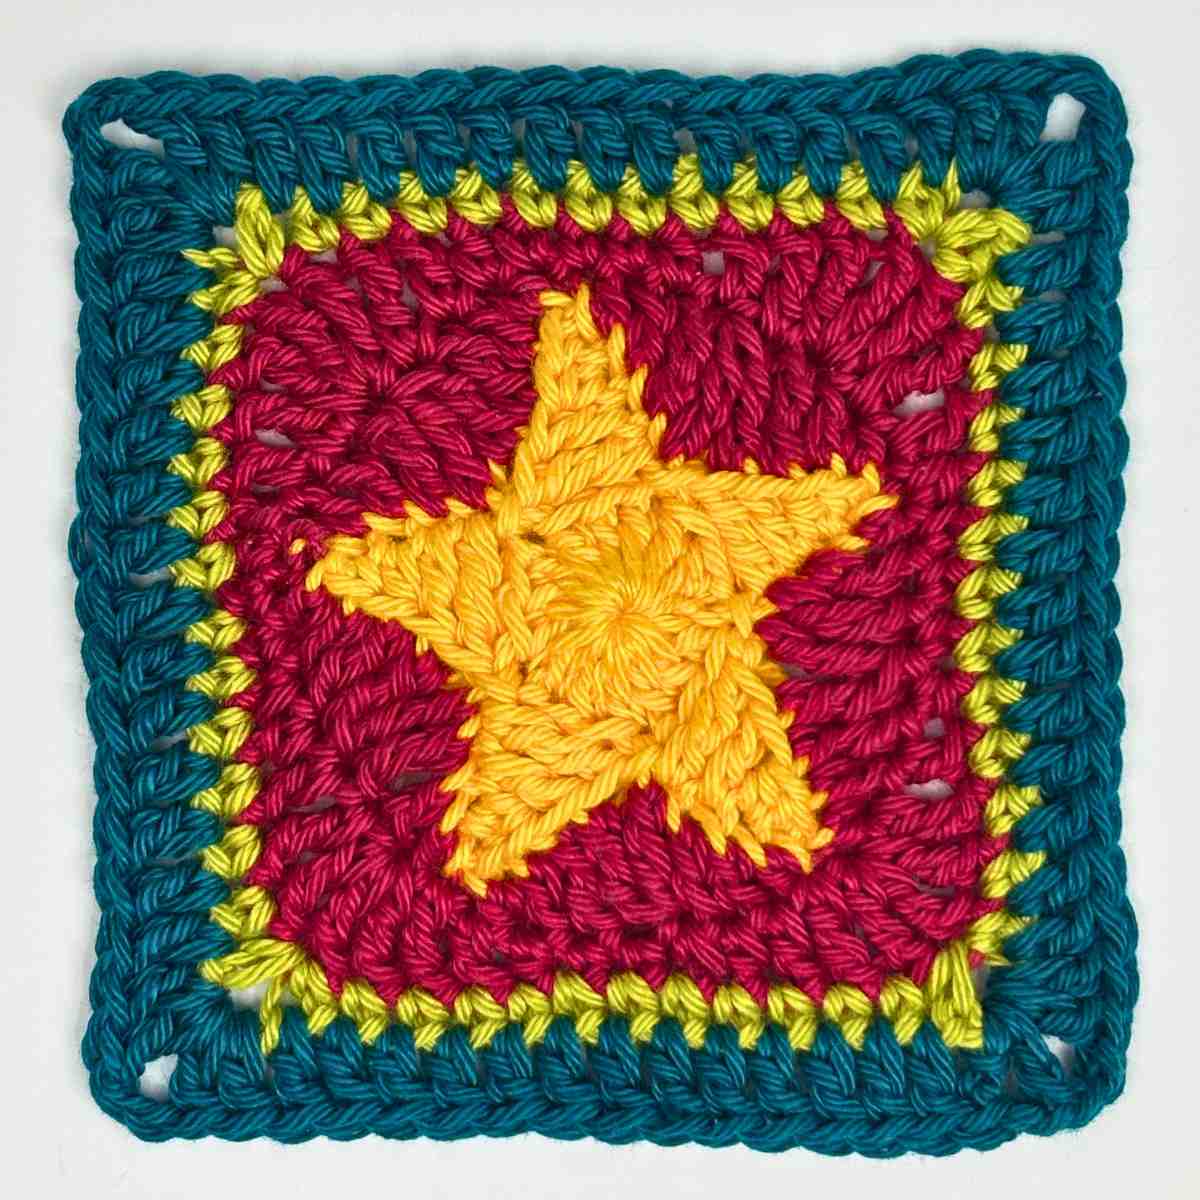
Round 6: Join Main Colour Teal with a slst to any corner sp. Ch3 (counts as 1dc), [1dc, ch2, 2dc] in same sp, *1dc in each st to next corner, [2dc, ch2, 2dc] in corner sp; repeat from * twice more, 1dc in each st to end, slst in top of beginning ch3, then fasten off. (68 dc and 4 x ch2-sps) – see image H below.
Weave in all ends, then continue with the mitred square body. If desired, steam your small square flat with a handheld steam or iron on wrong side.
Main Crochet Dishcloth Body (US terms)
Now work in rows along two sides only of your star square, turning after each row:
Row 1 (right side): Join Pink with slst to any corner sp, ch2 (does not count as a st), 1dc in same sp, 1dc in each st to next corner, [2dc, ch2, 2dc] into corner sp, 1dc in each st to next corner, dc2tog in corner sp, then turn. (20 dc along each of two sides and 1 x ch2-sp).
Row 2 (wrong side): Ch1 (does not count as a st throughout), 1sc in each st to corner sp, [1sc, ch2, 1sc] into corner sp, 1sc in each st to end, changing to Main Colour Teal on last yo of last sc, turn. (21 sc along each side and 1 x ch2-sp)
Row 3: (right side): Ch3 (counts as 1dc here and throughout), 1dc in each st to corner, [2dc, ch2, 2dc] into corner sp, 1dc in each st to end, then turn. (23 dc along each of two sides and 1 x ch2-sp).
Row 4: Repeat Row 2, changing to next colour on last yo of last st. (24 sc along each side and 1 x ch2-sp)
Rows 5-16: Repeat Rows 3-4 five times more, working in the following colour sequence for each two rows: Yellow, Teal, Red, Teal, Green. (39 sts along each side and 1 x ch2-sp).
Fasten off. Don't worry too much if your stitch counts don't match exactly. As long as your dishcloth sits flat and square then it's all fine.
Crochet Dishcloth Border (US terms)
With right side facing, join Teal to the spare corner of the original star granny square (top left corner sp). Ch1 (does not count as a st), [1sc, ch2, 1sc] in same corner, continue to work sc border all around, working approximately 38 sc along each side and [1sc, ch1, 1sc] in each corner stitch or space, slst in first sc, then fasten off and weave in all remaining ends.
Give your dishcloth a final steam (on wrong side) and pin flat to dry.
Free Crochet Dishcloth Pattern Begins (UK terms)
Abbreviations used (UK terms)
- ch = chain
- ch-sp(s) = chain space(s)
- dc = double crochet
- dtr = double treble crochet
- dtr2tog = double treble crochet two stitches together (to decrease 1 stitch - see special stitches below)
- her = half treble crochet
- slst = slip stitch
- st(s) = stitch(es)
- tr = treble crochet
- tr2tog = treble crochet two stitches together
- yo = yarn over
- Pattern repeat = [ ... ] or * or ** meaning to repeat instruction within brackets, or following the asterisk, as many times as stated
Special Stitches (US terms)
- Double Treble crochet 2 stitches together (dtr2tog)
- **Yarn round hook twice, insert hook into next stitch, yarn round hook then pull a loop through, [yarn round hook then pull through first two loops] twice**. Leave remaining loops on hook.
- Repeat from ** to ** once more (into stitch as specified in pattern) (3 loops now on hook).
- Finally, take yarn round hook then pull through all 3 loops.
Free Crochet Dishcloth Pattern Instructions (UK terms)
Star Square (UK terms)
Remember to use the recommended hook size for your yarn if you are not using aran weight (worsted weight).
With 4.5mm hook and Yellow, start with a magic ring, or ch5 then slst into the first of these 5ch to form a ring. Work Round 1 into the centre of the ring.
Round 1 (right side): Ch3 (counts as 1tr), work 14tr into the ring, then slst in the top of the beginning ch3. (15 tr) – see image A above.
In next round, you will make the star points.
Round 2: [Ch5, skip 1 ch (counts a ch1-sp), 1dc in second chain from hook, 1htr in next ch, 1tr in next ch, 1dtr in next ch, skip next 2 tr along Round 1, slst in next st] 5 times, then slst into base of first ch5. Fasten off Yellow. (5 star points) – see image B above showing first point.
Next, you will work around the star to fill in the gaps between the star points.
Round 3: Join Red with a slst to any ch1-sp at the tip of a star point (this is into the skipped ch1 - it looks like a horizontal strand of yarn - see image C above). Ch1 (does not count as a st), starting in same st: *1dc in ch1-sp, 1htrBLO in next st, 1trBLO in next st, 1dtrBLO in next st, dtr2tog over BLO of next st and first ch of next star (and therefore skipping the slst in between the points), working up next star point and along spare loops of chains, 1dtr in next st, 1tr in next st, 1htr in next st; repeat from * 4 more times, slst in first st. (40 sts) – see image D below for help with stitch placement.
Next you will create four corners. (UK terms)
Round 4: Ch1, 1htr in same st, *1dc in next 3 sts, 1htr in next st, 1tr in next st, 1dtr in next st, 3dtr in next st for corner, 1dtr in next st, 1tr in next st, 1htr in next st; repeat from * 3 times more, omitting final htr. Slst in first st, then fasten off. (48 sts) – see images E, F and G above.
TIP: Pop a stitch marker into each centre tr of corner group of 3dtr for help with stitch placement on next round (see images E to G above). Remove them as you work into each marked stitch.
Round 5: Join Green with a slst, to centre dtr of any 3dtr corner. Ch1, starting same st: *[1dc, ch3, 1dc] in centre st, 1dc in each st to centre dtr of next corner; repeat from * around, slst in first dc, then fasten off. (52 dc and 4 x ch3-sps)
Round 6: Join Main Colour Teal with a slst to any corner sp. Ch3 (counts as 1tr), [1tr, ch2, 2tr] in same sp, *1tr in each st to next corner, [2tr, ch2, 2tr] in corner sp; repeat from * twice more, 1tr in each st to end, slst in top of beginning ch3, then fasten off. (68 tr and 4 x ch2-sps) – see image H above.
Weave in all ends, then continue with the mitred square body. If desired, steam your small square flat with a handheld steam or iron on wrong side.
Main Crochet Dishcloth Body (UK terms)
Now work in rows along two sides only of your star square, turning after each row:
Row 1 (right side): Join Pink with slst to any corner sp, ch2 (does not count as a st), 1tr in same sp, 1tr in each st to next corner, [2tr, ch2, 2tr] into corner sp, 1tr in each st to next corner, tr2tog in corner sp, then turn. (20 tr along each of two sides and 1 x ch2-sp).
Row 2 (wrong side): Ch1 (does not count as a st throughout), 1dc in each st to corner sp, [1dc, ch2, 1dc] into corner sp, 1dc in each st to end, changing to Main Colour Teal on last yo of last dc, turn. (21 dc along each side and 1 x ch2-sp)
Row 3: (right side): Ch3 (counts as 1tr here and throughout), 1tr in each st to corner, [2tr, ch2, 2tr] into corner sp, 1tr in each st to end, then turn. (23 tr along each of two sides and 1 x ch2-sp).
Row 4: Repeat Row 2, changing to next colour on last yo of last st. (24 dc along each side and 1 x ch2-sp)
Rows 5-16: Repeat Rows 3-4 five times more, working in the following colour sequence for each two rows: Yellow, Teal, Red, Teal, Green. (39 sts along each side and 1 x ch2-sp).
Fasten off.
Crochet Dishcloth Border (UK terms)
With right side facing, join Teal to the spare corner of the original star granny square (top left corner sp). Ch1 (does not count as a st), [1dc, ch2, 1dc] in same corner, continue to work dc border all around, working approximately 38 dc along each side and [1dc, ch1, 1dc] in each corner stitch or space, slst in first dc, then fasten off and weave in all remaining ends.
Give your dishcloth a final steam (on wrong side) and pin flat to dry.
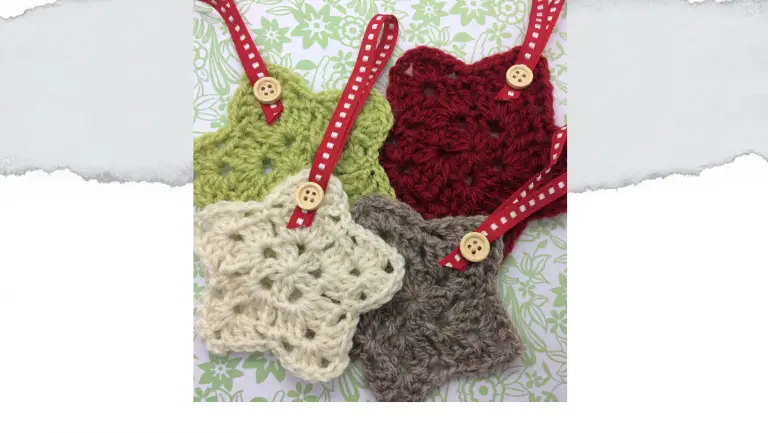
If you enjoyed crocheting your dishcloth, you may also enjoy my crochet trees pattern which is also free. You can find the blog post here:
Let's keep in touch!
I'd love to chat more.
Sign up for my newsletter and receive a weekly dose of crafting inspiration, featuring the latest trends, tips, and projects to fuel your creativity.